
Tags
Boat Tech, casting, Gaskets, polyurethane, Portlights, rtv, seals, Silicone
The aft end of the people part of Bright Water is fenestrated by portlights of unknown origin. They’re hefty chrome plated bronze with most of the bronze showing, and they’re good enough for what they are, which is old.

Mostly, the gaskets are old. The gaskets are about 3/4 inch high and originally molded of natural rubber. They’re now hard and have taken a set, and need to be cranked down to even pretend to seal. Since the bulwarks are non-vertical the portlights hold water (unless the seals don’t seal, in which case the porlights bring water below). We smear the seals with Vaseline before we close them. That way the portlights hold water and dirt, but mostly don’t leak until we open them.
We got an old but fairly good gasket from our friends on Dream Catcher. I patched the scratches and fixed depressions in the seal area with body putty and made a mold from RTV two-part casting silicone.

Hot-melt-glued formica walls on a hmg’ed formica base made the barriers,
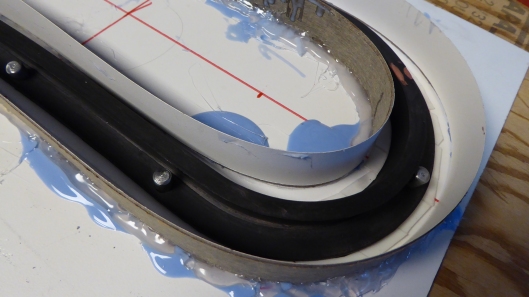
…then I double-back-taped the gasket down to try and get the sealing flange to sit flat. We put short steel pins in the fastener clearance holes to create pockets for later.

The two-part silicone mixed easily and de-gassed well in the vacuum chamber before we poured it into the mold. We let it set up for a week. The darker blue is from an earlier failed attempt when I didn’t buy a big enough resin kit.
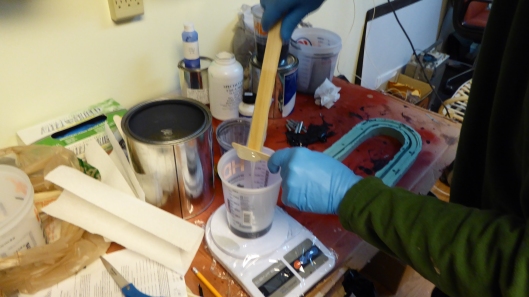
We used 40A two-part polyurethane. 100g of resin and 65g of activator, per instructions. The activator is a wicked sensitizing skin irritant so we’ve gone through a lot of gloves. Thin activator went in first, then the stiff resin. The stuff mixed well and you could see the texture change.

Then into the vacuum chamber for three minutes to degas.

We filled the mold slowly so we didn’t trap any bubbles. The resin is like syrup and it self-levels slowly but surely. A “vent” in the mold wall let excess resin drain into the center area of the mold, giving a pretty uniform flange thickness. You can see the longer steel pins for the fastener holes stuffed into the pockets formed when we made the mold.

After a six hour cure we spun the pins so they didn’t stick, and after twenty-four hours we peeled the edges of the mold free of the part.

Then the part came right out. We put it on a flat surface in it’s final shape in a warm area to cure for a week.


Here are the actual silicone and polyurethane resins we used. We got the silicone from ebay and the polyurethane from McMaster Carr.
The finished parts are a solid B or B+. The pattern part was distorted, so we’ll install these upside down relative to the pattern part so the non-deformed part of the seal is on the bottom. The PU is supposed to be water and UV resistant. We’ll see. I hope so. We’ll install them with black RTV against the glass.
Edit 10 March, 2016. The Forsch polyurethane did not cure fully on roughly every part. Three weeks later, some of them wrecked a piece of plastic they were sitting on. Almost all of them did not cure completely after at least two weeks at room temp. The mold is fine, so we’re looking for a commercial casting option.

On our cal 2 46 we have drilled small hole in the center bottom. The water only can fill the bottom lip 3/16 of an inch. As long as I make sure the holes are clean and the water drains, doesn’t seem to have enough pressures to leak through the port seal.
I would also like to know if you have a bearing on your prop shaft? I have added one mid way between cutlass and trans. Looks like there might have been one in the past on the bulk head just out side aft head door.
I am also having problems with the trans heating under sail and am going to try the Kiwi feathering prop this fall. Any thoughts?
I’ve seen the trick with the drilled hole in the portlight snorkle. I guess it would work since the bulwarks are solid fiberglass there, but I hadn’t thought about doing it. I’ll look again when we get back, thanks.
No mid-bearing on the prop shaft, except there may be a mid-cutless right aft of the stuffing box (inside the shaft tube). I’m not sure.
If we were going to voyage offshore, we would install a different prop and probably also a shaft brake, either a proper one or an oak pinch bar or a pipe wrench or something. Dunno. The forces with this prop are prodigious. For coastal cruising, the big prop is fantastic more often than it’s in the way, so we’ll stay with it for now. We did build a prop puller that we carry onboard now, and we have the original cut-down prop as a spare (much less blade area). Tip from others: If you get a folding prop, carry an umbrella to hang upside-down under the prop when you rebuild it underwater. Yikes. Also look at the Campbell Sailor Prop. Very little blade area so maybe less drag/torque if braked/stalled.
These are good questions for the 2-46 Google Group: https://groups.google.com/forum/#!forum/cal46
Nice Blog about Silicone Gasket. Thank You for sharing informative information